Manage a course
A course is an area where a trainer/admin will add resources and activities for their learners to complete. It might be a simple page with downloadable documents or it might be a complex set of tasks where learning progresses through interaction. Check the video below on a what a course looks like in your LMS (Moodle).
Note: The course may slightly look different depending on Moodle version of your LMS and the theme used. The basic functionalities and behaviour remains the same.
Course page overview
Once in the course page. You can see 4 components (Course index (Left), Course content (usually at the center), Blocks (Top, Right, Bottom of the course content) and Course navigation tab (on top of the course page, below header)
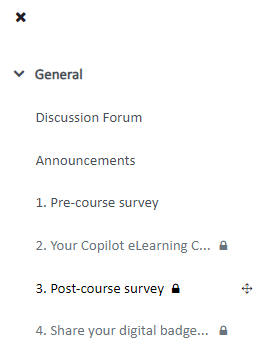
Course index - Easily navigate your course activities via this left course navigation panel. While on edit mode, the admin/trainers can re-organise the activities via the course index panel. Wait for the drag icon once you hover on the activity title. Refer to the screen grab below.

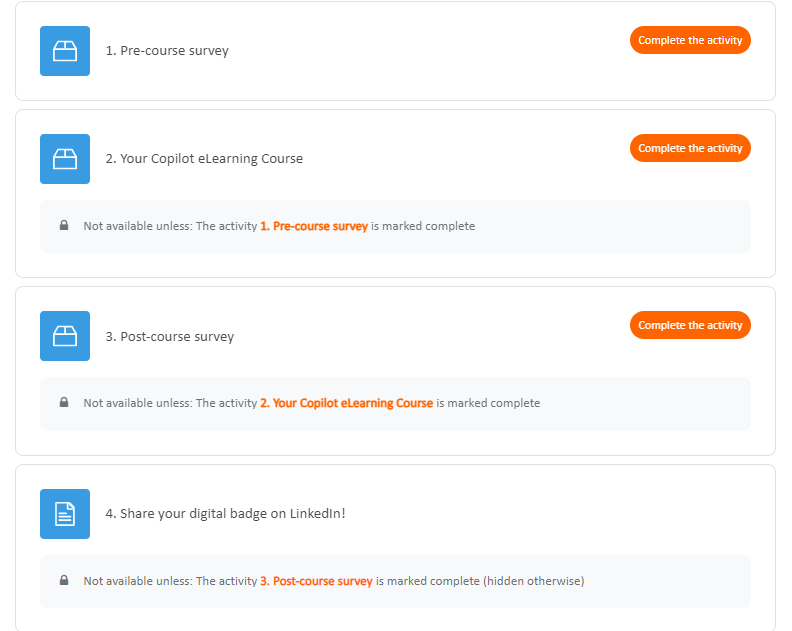
Course Content - The blocks holds all the activities and resources of the course. The look and feel of the display of the activities may differ depending the course configuration, theme etc. Refer to the below screen grab.

Blocks - Blocks add extra support for leaners and trainers to administer the course. Example: Completion progress block, Course overview. You can edit and configure each blocks once you are on course edit mode :e:. The configuration may vary from blocks to blocks.
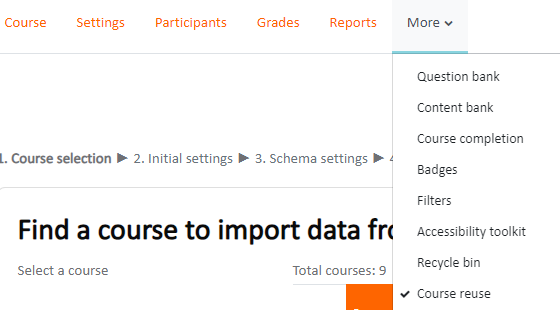
Course navigation - These provide a quick way for the admin/trainer to access important aspects of the course. The More link takes you to, for example, the Content and Question banks and Course reuse which incorporates Import and Copy. Refer to the screen grab below.

Find more details about the course page here.
Edit a course section
Enable Edit mode/turn editing on
Quickly rename sections from the pencil icon.
If Restrict access is enabled for the site, access to the section (including all activities and resources within it) may be restricted.
Restrict a course section
Enable Edit mode/turn editing on
Click on three dots/down arrow on the right of the section/topic name.
Select Edit section from the menu
Expand the Restrict access area and click on Add restriction
Select the type of restriction that suits your need and configure.
Check out Restrict access for more information.
Move a course section
(Note: The ability to move course sections is controlled by the capability moodle/course:movesections, which is allowed for the default role of teacher.)
Enable edit mode/turn editing on
Drag and drop the section either from the course central area or the Course index to your chosen location.
If your course is long you can also drag from the central area to a location in the Course index, and/or you can click the three dots next to a section, select Move and choose the location to move it to.
Add course sections
Enable edit mode/turn editing on.
If you are using Topics then find the location you want to add a new section and click Add topic.
If you are using Weeks then go to the bottom of the course page and click Add week.
Delete a course section
With the editing turned on, click the 'Edit' link to the right of the course section you wish to delete and then, from the menu that displays, click 'X Delete'. You will be prompted to confirm your wish to delete the section and its contents. Note that all activities inside the section and their user data will also be deleted. Use the Recycle bin to reverse this if you do it by mistake.
Link a course section
An admin setting Always link course sections can be enabled from Site administration > Appearance > Navigation and will link course sections so that when a course section name is clicked in the navigation block or the central content area, it will go directly to that section.
Add a block
Ensure you are on course main/home page and turn ON editing
Click on menu :f: icon located at the top-right corner
Click on Add a block to add blocks
Browse the blocks on the next page and select the block you want to add
Move a block
With Edit mode on, click the crosshair icon on a block.
While keeping the block selected, drag it to where you want to position it and let go.
Configure a block
With Edit mode on, click the gear icon on a block.
From the menu select Configure
On the next page, configure he block as desired
Block configuration page may look different for each block depending on its functionalities and usage.
Delete a block
With Edit mode on, click the gear icon on a block.
From the menu click on Delete with the name of the block.
