Enable & implement self-enrolment
Enabling and implementing self-enrolment method in a course eliminates Admin/Trainers to manually enrol learners in a course. With the use of enrolment keys (general & group) the learners can navigate to the course, supply the code and get enrolled.
Enable self-enrolment if not already on site level (Reach your Admin, if this not already enabled)
Configure self-enrolment global (site-wide) settings
Enable/Add self-enrolment method (course level - details below)
Configure self-enrolment on course (instructions below)
Decide whether to use group enrolment keys or not
Supply all the configuration details (important fields)
Enrolment key (Do not leave blank)
Use group enrolment keys (Yes - if you wish to use group enrolment keys)
If you already have an existing groups the course then don’t leave any group keys blank as well if you wish to proceed ahead with group enrolment keys
Only share the group keys you would want to use for enrolments
Always set Default assigned role to Learner (Unless you have different need)
Set a cap of max enrolled users with this enrolment method (this can be updated later as well)
Select ‘Send course welcome message’ - Select ‘No’ if you don’t wish to send any welcome message upon successful enrolment
Setup a custom welcome message
Find more instructions below.
Note: If you want your learners to create accounts on your site and have access to your courses, then you first need to enable Email-based self registration so they can create accounts, and then enable self enrolment within your course(s) so they can enrol. These are two separate steps.
Self enrolment is the method whereby users can choose to enrol themselves into a course, either immediately by clicking "Enrol me in this course" or by typing in an enrolment key they have been given. The enrolment plugin needs to be enabled by the site admin in Enrolment plugins and has to be enabled within the course. The manual enrolment plugin has to be enabled in the same course as well.
Enabling self-enrolment in a course
In your course, click the Participants link from Course navigation
From the dropdown select click Enrolment methods
Open the "eye" icon next to the Self enrolment method (if this is already added and disabled)
check below on how to add an enrolment key to a course.
Adding an enrolment key to a course
In the course administration navigation tab, click Participants > Enrolment methods
On the next page ensure self enrolment is enabled (has its eye open) and then click the edit icon on the right.
Add your enrolment key in the box provided. (Click Unmask to see what you are typing.)
Don’t know leave the enrolment key blank unless you want the learner to enrol with no keys.
Configure other settings as well
Click the 'Save changes' button.
Note: If you only prefer to enrol the learners on specific group then put a random and strong long key for the course and don’t share this with any one. Just share the group enrolment keys for self-enrolment.
Adding a group enrolment key to a course
If you wish your users to enrol themselves directly into a group in the course then you can set a group enrolment key which you then tell them to use instead of the course enrolment key you will have also set when they access the self-enrolment screen.
Setting a group enrolment key
It is possible also to enrol students into the course and also directly into groups by use of a group enrolment key. Note: The groups must already be created.
To do this, you first need to add the course enrolment key as in the section above.
If you do not set a master course enrolment key for the course, then anyone can enrol without a key and users will not be put into groups.
Users in groups do not need to know the master course enrolment key, only their own group enrolment key.
Users not in a group can use the master course enrolment key as usual
Change the setting Use group enrolment keys to Yes
Save the changes and then in the Course administration settings,
Go to Participants tab > select Groups from the drop down option
Click on Create group on the next page or select the existing one and Edit group settings
Add an enrolment key to the group. This will be the key they type in to access the course. (The course enrolment key is simply there to keep others out)
Note: Be careful not to use the same enrolment key for more than one group! A warning message will appear 'This enrolment key is already used for another group.'
Setting the enrolment period
Tick the "enable" box to the right of Enrolment period and then choose your dates.
Enrolment duration
Set the amount of time a user enrolment is valid, starting with the moment the user enrols themselves. If disabled, the enrolment duration will be unlimited.
Notifying users when their enrolment expires
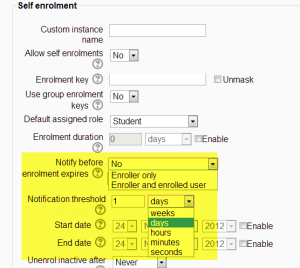
It is possible also for students and/or teachers to be notified when enrolments expire by selecting either "Enroller only" or "Enroller and enrolled user" from the dropdown "Notify before enrolment expires" and a time in "Notification threshold".
If there is more than one user with the role of teacher, then the notification is only sent to the first user to be assigned the role of teacher (or other user with the capability to manage self enrolment).

Settings for notifiying users before enrolment expires.
Editing individual enrolment times
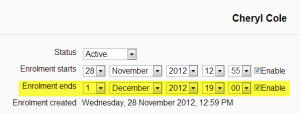
It is possible to edit the date and hour of an individual's enrolment from Course administration tabs >Participants>Enrolled users (selected by default on the Drop down) by clicking the edit (Cog/gear icon) in the Status column for the user. This then brings up a screen where the date and time can be modified.
 Click the edit icon in the enrolment methods column for the user |  Modifying the date and time |
Unenrolling students who haven't been active on the course
From course administration tabs > go to Participants > Enrolment Methods > click on edit (cog icon) Self-enrolment method instance > scroll down to Unenrol inactive after > Choose from the drop down to the right of "Unenrol inactive after..."
Deciding the maximum number of users in your course
Type the maximum number of users you want in your course in "Max enrolled users". When this limit is reached, nobody will be able to self-enrol. If you leave the number at 0 then there will be no maximum number.
Allowing only cohort members to self-enrol
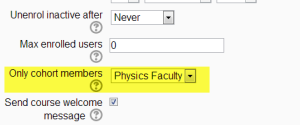
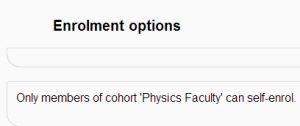
If you have cohorts set up, then you can restrict self enrolment to particular cohorts by selecting the name of the cohort from the drop down box, A member of the cohort can self-enrol as normal; whereas a non-member gets a message telling them they are not able to self-enrol.
 Restricting self enrolment to members of a particular cohort |  Message seen by a user not in a cohort who is attempting to self-enrol |
Sending a welcome message to new users
If enabled, users receive the following message via email when they self-enrol in a course:
Welcome to {Course name}
If you have not done so already, you should edit your profile page so that we can learn more about you: {link to profile page}
If you want to send a different message, simply type it in the custom welcome message text box.
The following placeholders may be included in the message:
Course name {$a->coursename}
Link to user's profile page {$a->profileurl}
User email {$a->email}
User fullname {$a->fullname}
The welcome message may be sent from the course contact, the Keyholder or from the default no-reply address. If the course contact is chosen, and there is more than one user with the role, then the welcome message is sent from the first user to be assigned the role of course contact.
Note: An admin can customise the message for the whole site by editing the welcometocoursetext language string. See Language customisation for further details. However, if the welcometocoursetext language string is used, only the placeholders coursename and profileurl may be used.
Admin settings
The self enrolment plugin may be enabled or disabled throughout the site in Administration > Site administration > Plugins > Enrolments > Manage enrol plugins.
Shared settings for all courses
The page Administration > Site administration > Plugins > Enrolments > Self enrolment. contains options for defaults that admin can set:
Require an enrolment key - if this box is ticked then all courses with self-enrolment enabled will need to have an enrolment key. The setting won't save until the teacher adds a key - something to be aware of as this can cause confusion:)
Use password policy - tick this box if you want enrolment keys set by teachers to follow the password policy of the site.
Show hint - tick this box if you are prepared to allow the first letter of a key to be given as a "hint"
Enrolment expiry action - specifies what happens when user enrolments reach expiration date. Please note that option "Unenrol user from course" purges grades, group memberships, preferences and other user related data from the courses.
Hour to send enrolment expiry notifications - specify hour for sending expiration notifications.
Default enrolment settings in new courses
These can be set in Administration > Site administration > Plugins > Enrolments > Self enrolment but teachers in individual courses can alter them to suit their needs:
Add instance to new courses - if admin selects this, then any new course created will include the self enrolment plugin
Enable self enrolments- if this is enabled then users by default can self enrol into a course.
Use group enrolment keys - the setting for group enrolment keys in a course will be set to "yes" by default
Default role assignment - normally, when users self enrol, they have the student role. If necessary that role can be changed by default here - for example - if your Moodle has a dedicated role you wish to use instead.
Enrolment duration - this sets the default enrolment length for new courses (but again, may be altered by the course teacher.)
Notify before enrolment expires - specifies if teacher or optionally students should be notified before the expiration.
Notification threshold - specify how many days should be users notified before the enrolment expiration.
Unenrol inactive after- this sets the default time after which a student will be unenrolled if they haven't accessed the courses. (Teachers may change this)
Max enrolled users - adding a number here will specify the maximum number of users who can self-enrol into new courses. Teachers in the course can change this. If it is left at 0, there will be no maximum.
Send course welcome message- if this box is checked then newly enrolled users will receive a welcome message by default.
Self enrolment method options
One course may contain multiple self enrolment methods. User may be enrolled once in each instance only.
Custom instance name - specify custom enrolment method name.
Enable existing enrolments - if disabled all users enrolled via this plugin can not access course.
Allow new enrolments - disable if you do not want to allow students to self enrol in the future.
Enrolment key - specify key required for enrolment.
Use group enrolment keys - optionally use group keys for enrolment too.
Default assigned role - specify role to be assigned to users during enrolment, this can be changed manually after enrolment.
Enrolment duration - specify enrolment length, this can be manually after user enrolment.
Notify before enrolment expires - specifies if teacher or optionally students should be notified before the expiration.
Notification threshold - specify how many days should be users notified before the enrolment expiration.
Unenrol inactive after- specify time after which a student will be unenrolled if they haven't accessed the courses.
Max enrolled users - adding a number here will specify the maximum number of users who can self-enrol into this course.
Only cohort members - optionally restrict this enrolment method to members of specified cohort.
Send course welcome message- if this box is checked then newly enrolled users will receive a welcome message by default.
Custom welcome message - specify custom message if necessary.
